There are many photoshop users and they could be using it for either for fun or business.
Background removal is one of the key techniques to master when using Adobe photoshop and is needed for most niches of phot editing. Its as important as photo clipping.
This quick tutorial is all about showing you how to remove this background in photoshop. T may seem difficult but you should be able to do this fairly easily
How to Remove Background in Photoshop Using Different Tools
Photoshopn has a litany of tools to remove backgrounds from iagmes. And you can usee whatever suits your design needs Here are four different ways to remove background images.
1. Quick Selection:
Quick selection is what the name states. This will find edges separating the subject from the nacgournd and after selecting the sbhect.
You can modify the selection based on what you are looking for.
2. Magic Wand:
The Magic wand tool separates subject from background by reading the color and tone.
It doesn’t fully understand the differences between subject and background. It can’t fully ready pixels. It reads similar tones and colors and select subject based on this reading.
3. Background Eraser:
Like with the magic wna dtool this tool too can’t see between subject and background and separates one color from the other. You just need to tell photoshop what color you’d like to eekep and what to remove.
It doesn’t fully matter if its background or foreground and hte tool remvoes it.
Let’s explore these methods of removing the background.
4. Select Focus Area :
This method chooses the focus area of image and selects the focus area
And mark the same as subject. This works when the image is sharply focused as is the case with this image.
select the focus area and mark it as the subject. So this method
Method 1: How to Remove Background Using the Quick Selection Tool
Step 1 : Open
Go to file and clik open to open file to work on. In this case I opened the image of a woman I had on my computer.
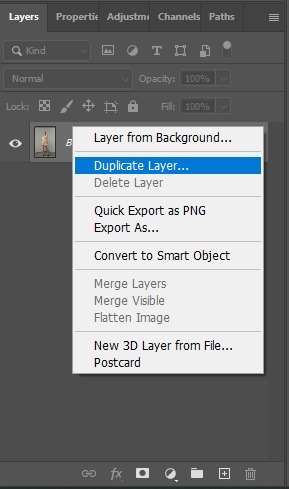
Step 2 : Duplicate Layer
Make a copy of the of the bnackournd layer and right click on background layer and select duplicate layer , then press ctrl +k to see the selection on the keyboard.
Hide the Background Layer by clicking on the Eye icon beside the layer.
Step 3 : Take the Tool
From the toolbar menu, select Quick Selection Tool. Its located at the upper portion of the toolbar.
Step 4 : Select Subject
Now, click on Select Subject from the top menu.
This tool automatically identifies and selects the sbjc using AI
As this is artificial intelligence, there is a good possibility that it might not be able to select the area accurately. So, you’ll have to work on the selection and get it to focus better.
You can also select the free select tool.
Adjust your brush size according to your need from the top menu. There are multiple brush sizes available. IN this image above I drew a freehand around the woman to remove the black background from around her.
If you want an area added that is inside your selection, just click on that. Sample applies to if you want to remove an area from selection, press atl on the kewywobar and click on the raa.
Step 5 : Add Layer Mask
When happy with the selection visit the layer panel and visit the layer mask to add the mask.
When you are done selecting go to the layer panel just beside properties and add a mask.

After adding the layer mask the background will be removed.
Step 6 : Save
Go to file and click on save as to save the image. Keep the jpeg and psd files for future use.
Method 2: How to Remove Background Using the Magic Wand Tool
Step 1 : Open
From the top menu choose select file and click on open and chose file you want to work on.
Step 2 : Duplicate Layer
Create a copy of the background layer and right click on background layer and select duplicate layer. Press ctrl+j on the keyboard if you are using Windows. This does the job of preserving your selections and prevents accidental edits on them being made.
This keeps the layer selections safe. You can see the different layers available on the bottom right screen corner. You can toggle between layers and make something disappear from that point on.

Hide the background layer by clicking on the eye icon beside the background layer.
Step 3 : Take the Tool
Go to the toolbar and select the magic wand tool. This tool quickly selects the image based on ai and you can easily Find it under quick selection tool.

Step 4 : Adjust the Options
Adjust the options so you can get a better selection. You will find these options on the top menu.
1. Tolerance
The tolerance level determines range of color this tool wil select based on the range of the selection. It will select shades of color based on the tolerance levels youpick. If the subject and background sport similar tolerance levels choose higher tolernace If not keep it lower.
2. Contiguous
If its not marked, it picks up similar color tones in the image with your first click. So just mark it to select pixels connected to the first pixel.
3. Anti-Alias
THis option makes edges smoother and gives the image a natural look by softening edges and allowing semi transparent pixels to the image.
4. Sample All Layers
If there are multiple additional layers in the image, choosing this option wiil apply changes on all layers and otherwise the changes will be on the current layer alone.
Step 5 : Configure the Tool
As the magic wand tools supports color and tone, you need to pick the color of background. Now justt click anywhere on the background and this tool selects the area with the color.
You may need to correct selection. Click on add to selection and click on any area you want to choose.
Step 6 : Select and Mask
When your selection is done, go to the Select option. Under that, click on Select and Mask.
Step 7 : Refine Edges
Click on Invert to make your subject visible.
Now, shift the sliders if you need to smooth the edge or make any other changes. Staring from the output option, select new layer and with layer mask. And click on OK
Step 6 : Save
Go to file click on save as and save the image as either JPEg and PSD file.
Method 3: How to Remove Background Using Background Eraser Tools
Step 1 : Open
Go to file and select option to open the file you want to work on
Step 2 : Duplicate Layer
Make copy of background layer and right click on background layer and choose duplicate layer. Or press ctrl and j on the keyboard. THis makes for safety.
Next hide the background layer by clicking on the eye icon beside that layer.
Step 3 : Take the Eraser Tool

Step 4 : Adjust the options
Next you get options to adjust the selection at the top menu. Understand these option to apply these changes to the image the right way.
1. Sampling Options
- Continuous: It picskt he same ple when you drag the brush.
- Once: Iit picks the color you click at first and will remove that color
- Background Swatch: IIt just erases only the background color and you can give sampel of the clolor and that removes the particular color alone.
- color, and this will remove that particular color only.
2. Limits
- Contiguous: It just chooses your pixels based on the simple logic of pixels coming under plus sign
- Discontiguous: This earases everything inside the big circle and that which matches the color you are erasing
- Find Edges: This finds edges and separates those from the background.
3. Tolerance
This determines brush sensitivity. The tolerance levels depewnds on the area of the image you are working under.
So experiment with a bunch of difefernet tolerance settings.
If yur subject and background have similar colors, you would do good by keeping tolerance levels lower.
4. Protect Foreground Color
Give photoshop a sample of the foreground color and it doesn’t erase the color when brushing. Using this option saves foreground color.
Step 5 : Set the Brush Size
From the top menu, what you should do next is choose the brush size and its hardness.
Step 6 : Erase the Background
Zoom the image according to your need and see edges properly
The start brushing on the background of the image. It remvoes background almost immediately and urgently.
Be careful enough not to brush on the subject. This tool doesn’t recognize the subject. It just removes the area you will want to brush on.
Step 7 : Save
Save the image as and when you are done and click save as to save this file.
Method 4: How to Remove Background Using Select Focus Area
Step 1 : Open
Next open the file by clicking on file and then choose open.
Step 2 : Duplicate Layer
IN this next step make acolpy of the background layer. Right click on the background layer and then select duplicate layer or press ctrl J on the keyboard. This is for safety.

Hide the background layer by clicking on the eye icon beside the layer.
Step 3 : Take the Tool
Take quick selection or the magic wand tool from the tolbar. Btha re under the same menu.
Step 4 : Select Focus Area
Go to the select menu and from the tpop bar click on focus area.
A box will pop up.
Step 5 : Adjust the options
Set the options according to your needs. Change the in focus range as well as noise level present.

Set the Output to New Layer with Layer Mask.
Step 6 : Save
Go to File and click on save as to save the file. CHoose file format as per ned.
Offshore Clipping Removes Image Background as per your Need
The background removal removal is fairly easy but if you still need help or there are hundreds of images hire us
your photo editing works done. They have expert hands who are trained for specific jobs. You can get a free trial too. Most importantly, they will take care of your images as their own.
Most noteworthy, there you have several different ways you can remove a background in Photoshop and then replace it entirely on some other desired one. Certainly, it’s all yours to choose the method that works well for your situation.
How to Make an Image Transparent Background in Photoshop
Sometimes you need to upload an image that requires benign transparent to look at compared to original background.
In similar cases, it would be convenient to load a png image as it provides you with necessary conversions.
In this article you are going to get into the details of how to remove image background to make images transparent inside of Photoshop
Leave a Reply